How to Add Style to an Ordered List

Ordered lists aren’t exactly the most exciting HTML element you can add to any given project, but it can’t be denied that they have your uses. Because it can be so hard to select the default numbers that an ordered list creates, it’s hard to really add a lot of style to this type of element. So what do you do when you need to have an ordered list on your site, but you don’t want it to look boring or too formal? With the help of some bright colors and stylized fonts (and the <span> tag), we can easily spice up our boring old ordered list elements to make them look fun and modern. Check out the tutorial below to see how it’s done:

The HTML

So to start, you’ll need a standard ordered list. For this example, we’re using filler text from Bacon Ipsum, a fabulous filler text generator that will really add some meat to your mockups.

Here’s how your list might look:

<div class="styled-list">
  <ol>
    <li><span>1.</span><p>Bacon ipsum dolor amet pariatur veniam sirloin esse dolore. Ex sunt deserunt chicken shank corned beef ipsum fugiat pork chop spare ribs hamburger cow. Tri-tip picanha tail ut fatback dolor beef shank nulla beef ribs kevin magna. </p></li>
    <li><span>2.</span><p>Reprehenderit porchetta in magna voluptate beef ribs pork chop biltong. Tri-tip dolor shoulder irure picanha pastrami flank tempor magna. Enim ham hock ut, alcatra ipsum doner pig brisket aliqua porchetta tongue dolore fugiat. Sausage sint aliqua meatball pancetta nulla swine fatback.  </p></li>
    <li><span>3.</span><p>Nisi pork loin leberkas, bresaola beef ribs sint esse eu bacon pancetta fatback. Dolore nulla porchetta, t-bone et cupim nostrud occaecat chicken culpa ea. Et adipisicing ullamco, corned beef kevin pig jerky cillum ham hock ground round mollit.   </p></li>
  </ol>
</div>

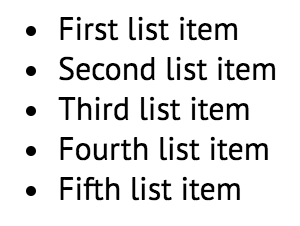
So right now it looks pretty boring, like this:

Screen Shot 2017-03-06 at 1.45.34 PM
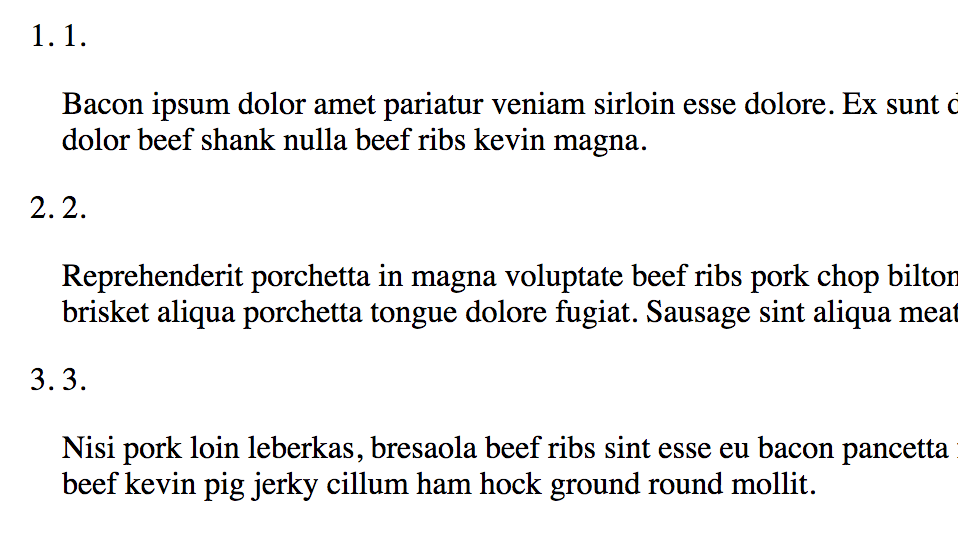
We definitely need to add some CSS.

The CSS

Here’s the fun part. We’re going to get rid of the default ordered list numbering by using the list-style-type property with a value of none, then we’re going to add some major style to the numbers in the span tags, because we can select span tags much more easily than we can select the numbers in an ordered list. Take a look at the CSS below:

@import url(https://fonts.googleapis.com/css?family=Pacifico|Archivo+Narrow:400,700,400italic,700italic);

body{
    font-family: 'Archivo Narrow';
    background-color: #aaeedd;
}

div.styled-list{
    width: 400px;
    margin: 50px auto;
    background-color: #fff;
    border-radius: 5px;
    padding: 20px;
}

div.styled-list ol{
    list-style-type: none;
}

div.styled-list ol li{
    position: relative;
    margin-bottom: 20px;
}

div.styled-list li p{
    padding-left: 50px;
    color: #444;
}

div.styled-list span{
    position: absolute;
    font-family: 'Pacifico';
    font-size: 30px;
    color: #222;
}

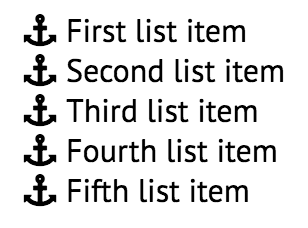
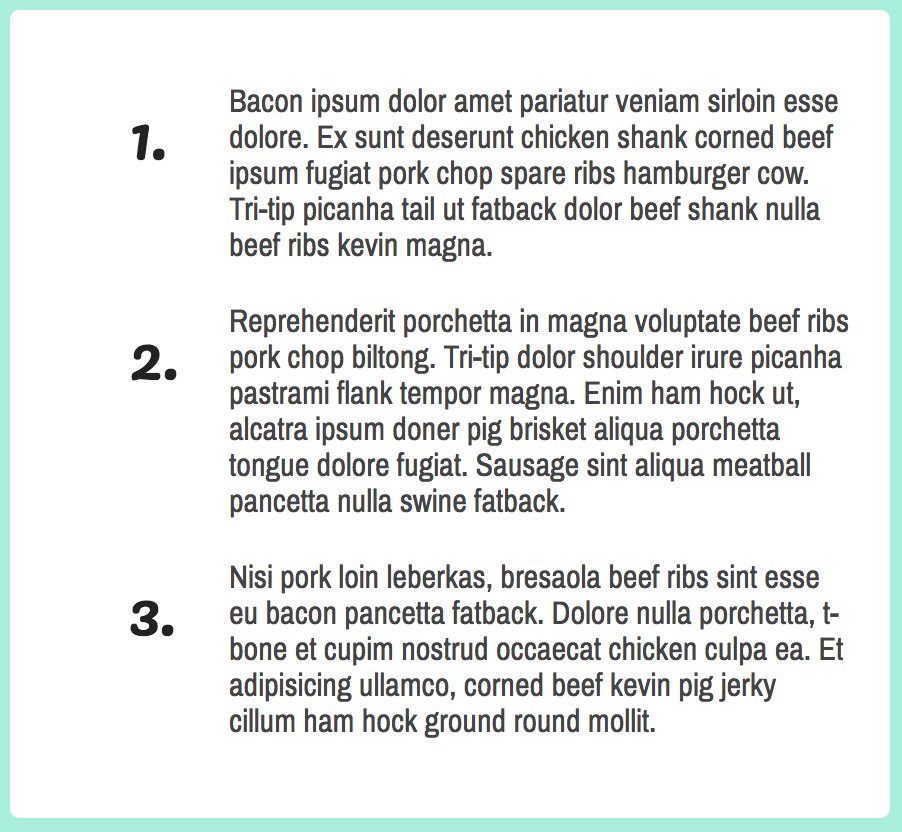
Now, your stylish ordered list should look a little something like this:

Screen Shot 2017-03-06 at 1.41.02 PM

For the purposes of this example, we used the font-family “Pacifico” to add some much needed style to the numbers. We also played around with the placement of the numbers in relation to the list content for a more stylized look, and, of course, we changed the font from the style-less default serif look to a more sleek and modern sans-serif (Archivo Narrow).

As with any CSS snippet, this one is totally customizable. Play around with the colors, fonts, spacing, positioning, and overall styling so that it meets the needs of your particular projects. Add hover effects with transitions, add stylish links, add a cool background — the possibilities are endless.

10 Free and Fun Filler Text Generators

Even if you absolutely love your job as a web developer or designer, there are still times when we could benefit from adding a little more whimsy to our day. A great way to do this is with a free, fun, and harmless filler text generator. It’s a standard practice to use the old Latin Lorem Ipsum… text as a placeholder for actual test in a preliminary design or product, so why not spice it up a bit? What follows is a list of fun and free text generators that are sure to put a smile on the face of anyone who comes across them.

1. Bacon Ipsum

Bacon Ipsum is one of the more popular alternate text filler generators. Basically what it does is insert the names of meats, cuts of meat, and meat dishes into an otherwise standard Lorem Ipsum passage.

2. Samuel L. Ipsum

Instead of the standard Lorem Ipsum, this generator gives you text straight out of a Samuel L. Jackson movie. It’s definitely not suitable for work, but if you’re really determined to use it in a project, there’s a “lite” version of the plugin that generates text sans any profanities (there’s also a “classic” version that generates the quotes sprinkled in with some Lorem Ipsum, if you’re a traditionalist).

3. Cat Ipsum

If you’re not a cat person then you might not appreciate this one. Cat Ipsum generates text that reads like a stream of consciousness from a cat. It also gives you the option to start it off with a little Latin or to just dive straight into the mind of a feline.

4. Yorkshire Ipsum

This generator provides text meant to mimic the accent of a person from Yorkshire, England. The accent is famously hard to understand, so depending on where you’re from and you who are, Yorkshire Ipsum could be more difficult to decipher than classic Latin.

5. Hodor Ipsum

Screen Shot 2017-02-21 at 12.59.23 PM

Unless you’re a Game of Thrones fan, this text generator probably won’t interest you. The only word that the generator provides for you is, naturally, Hodor. But at least the passages are punctuated. Choose from the dropdown list how many Hodors you want — each Hodor corresponds to another paragraph of, yeah, Hodor.

6. Hipster Ipsum

Hipster Ipsum generates paragraphs of text that only include hipster words — quinoa, listicle, venmo, bicycle, sriracha, williamsburg, etc.

7. Pirate Ipsum

Pirate Ipsum will generate a block of text that is all in “pirate speak” — think a lot of “ayes,” “scaleywags,” and “mateys.”

8. Office Ipsum

Office Ipsum generates a collection of text having to do with work and office environments. Basically, it’s a huge list of business buzzwords that you’ve probably heard a thousand times before in hundreds of meetings or conference calls.

9. Cheese Ipsum

Because you can never have too much cheese in your life, this text generator gives you a list of so many different types of cheeses that your mouth will be watering just reading it. This isn’t just a list of snotty, high-brow cheese either — queso is listed right next to camembert.

10. Hairy Ipsum

This generator is for those who want to add a little manly ruggedness to their projects. The generator will provide you with a list of words that are the pinnacle of masculinity — mustache, boxing champion, etc.

How to Create a Stylish Download Button with CSS

We’ve already covered how to create animated buttons, but if you’re looking to take your button animations and animation functionality to the next level, you’ll want to take a look at this tutorial that demonstrates how to make stylish download buttons that utilize smooth CSS animations.

The HTML

The download button has two parts — the button itself, and the tab that will appear under the button whenever the user hovers over it. Your HTML will need to account for both of these components. Here’s how it should look:

<a href="" class="download">Download</a>
<a href="" class="download bottom">File Size: 8MB</a>

Of course, the secondary tab (with the class “download bottom”) can say whatever you like. Keep in mind, however, that it does prove to be more aesthetically pleasing to have the secondary tab smaller than the button itself, so you might want to keep the content of the second tab short and to the point.

The CSS

Styling the button and the secondary tab is fairly easy and doesn’t require an excessive amount of CSS. Take a look at the code below to see for yourself.

body{
    font-family: 'Alegreya Sans';
    background: #708292;
}

a.download{
    text-decoration: none;
    color: #fff;
    background: #50a6f6;
    padding: 8px 10px;
    border-radius: 3px;
    display: block;
    width: 120px;
    margin: 100px auto 0 auto;
    text-align: center;
    z-index: 100;
    transition: opacity .8s ease;
}

a.download.bottom{
    width: 100px;
    background: #b7d4ee;
    opacity: 0;
    margin-top: 0px;
}

a.download.bottom{
    border-radius: 0 0 3px 3px;
}

As you can see, we make the secondary tab (a.download.bottom) invisible by giving it an opacity of 0. We also apply a transition effect to the primary button so that when the hover effect takes place, it happens with a nice smooth transition. This is what our button should look like at this point:

Screen Shot 2017-02-15 at 9.53.12 AM

We’re only one like of CSS away from finishing the simple, sleek button. What’s missing is the instructions that will allow the secondary button to appear below the primary button when it’s hovered upon — basically, what’s missing is a hover effect.

The CSS code for the hover effect should look like this:

a.download:hover + .bottom{
    opacity: 1;
}

This code selects the secondary tab, but it only applies when the primary button is hovered upon. By changing the opacity from 0 to 1, it allows the secondary tab to appear smoothly (thanks to the transition effects we added before) whenever the primary “Download” button is hovered upon.

Here is what your button should look like at any point that you hover over it:

Screen Shot 2017-02-15 at 9.53.03 AM

As always, color, size, font-family, and shape can be totally customized to suit any project or theme. Play around with this snippet to really make the button your own.

10 Best Free Icon Sets for Your Design Projects

If you’re a web developer or designer, chances are there are few things you love more than a good set of freebies. Free graphics are hardly hard to come by, but quality free brackets aren’t quite as common as you might hope. Luckily for you, we’ve curated this versatile list of free icon sets that will add dimension, color, and flair to any of your websites and designs. Keep reading to see if any of these sets might be right for you or one of your projects.

1. Free Shopping Cart Icons

Screen Shot 2017-02-08 at 1.32.25 PM

This collection of shopping related icons is perfect if you’re working on a retail or ecommerce project. The set comes with Add to Cart buttons, shopping cart icons, shopping bag icons, and some small shopping basket graphics. Definitely a good set to have in your arsenal, even if you don’t currently have an ecommerce project going on.

2. Calendar Icons Set

Screen Shot 2017-02-08 at 1.36.55 PM

This icon set features 8 different calendar designs that come as PSDs with organized layers, making it easy to customize dates and colors to reflect the needs of your individual projects.

3. 100 Kitchen Icons

Screen Shot 2017-02-08 at 2.41.09 PM

Perfect for any projects having to do with restaurants or the culinary world. Some of the icons included in this set are ones that you certainly wouldn’t find in a generic or all-purpose collection, including corkscrews, rolling pins, juicers, whisks, and strainers.

4. New York Building Icons Set

Screen Shot 2017-02-08 at 2.50.41 PM

Inspired by the buildings of New York City, most of these simple icons could easily represent buildings or skyscrapers belonging to any urban city. A very professional looking set.

5. Fileicons

Screen Shot 2017-02-08 at 2.58.54 PM

This colorful set of icons that represent various files with different extensions is very useful for any web developer to have on hand. The files come in several different sizes for all of your possible icon needs.

6. One-line Startup Icons

Screen Shot 2017-02-08 at 3.00.12 PM

An icon set inspired by startup (and, dare we say, hipster?) culture. The cool thing about this set (besides the Darth Vader icon), is that they were all drawn using one loopy line, which adds a cool variation to the startup theme.

7. Zen Icons

Screen Shot 2017-02-08 at 3.02.00 PM

With only 12 icons included in this set, the collection isn’t quite as useful or versatile as others on this list. But what it lacks in practicality, it makes up for in beauty. The intricate details are what make these icons unique. Perfect to use in a portfolio site or something similar.

8. Flat Social Icons

Screen Shot 2017-02-08 at 3.06.10 PM

This basic set of flat social media icons is perfect for linking to any social media presence. Colors and shapes are totally customizable.

9. Flat Business Vector Icons

Screen Shot 2017-02-08 at 3.08.06 PM

This set of business-related icons can be used in many different types of projects for professional businesses. As a designer or developer, you can’t go wrong by having these in your personal icon collection.

10. Flat Line Icons

Screen Shot 2017-02-08 at 3.09.59 PM

If you’re looking for a generic, versatile icon set, this is a great option. It includes all the basic icons a developer might need — arrows, play buttons, envelopes, music notes, pencils, etc, all in a simple, modern aesthetic.

Installing a WordPress Plugin

If you’re new to WordPress, the concepts of plugins, themes, widgets, etc might be a little overwhelming. There are definitely a lot of options and components that go into creating a WordPress site, and one of the best features of a WordPress site is the sheer number and versatility of the plugins available for use. Seriously, there’s a plugin for almost anything you can thing of — from really useful things like ecommerce integration, to less useful things like adding falling snowflakes to the pages of your WordPress site. If there’s a feature of functionality you want to add to your WP site, chances are there’s a plugin for that.

If you’re wondering how to install one of these plugins, there are a few different ways you can go about it. Keep on reading to learn more.

Search for a Plugin

The left-hand menu of your WordPress dashboard has a menu item called “Plugins.” If you hover over that link, you’ll see a few options. Click “Add New,” which will bring you to WordPress’s Plugin repository. You can browse through the Featured, Popular, and New plugin sections, or you can search specifically for a plugin or type of plugin by using the search bar in the top right corner of the page.

Screen Shot 2016-11-27 at 4.44.01 PM

Once you’ve found the plugin you’re searching for, click the Install Now button in the top right hand corner of the plugin’s listing. The plugin will then be installed, and you’ll have the option of whether or not you’d like to activate it (most likely, you will want to), and then you’re free to start using it/configuring the settings.

(Note: depending on your hosting plan and how your permissions are configured, you may not be able to install plugins this way. If that’s the case, see the methods below).

Upload a Plugin

On the Add Plugins page, there’s also the option to upload a plugin (at the top of the page next to the Add Plugins title).

Screen Shot 2016-11-27 at 4.54.30 PM

To upload a plugin, first you’ll have to have it downloaded onto your local machine. To download a plugin, you can use the official WordPress plugin repository page (or get a free or premium plugin downloaded or purchased from a third party site) and use it by searching the same way you searched through the repository on the Add Plugins page. The only difference between this page and the page on your dashboard is that the plugins in this repository download directly to your machine.

Once you’ve got your plugin on your computer, you can upload it using the “Upload Plugin” option. Make sure the plugin you want to upload is in a zip format, choose the file, and click “Install Now.” The plugin installation should then happen seamlessly, and you’ll again get the opportunity to activate the plugin.

Upload a Plugin via FTP

This is the option for manual plugin installation via an FTP client (if you don’t already have one, Filezilla is great). To install a plugin this way, you’ll need to make sure you have your desired plugin downloaded onto your local machine, just like in the process above — this is where the WordPress Plugin Repository will be useful to you again.

After you’ve got your plugin downloaded onto your computer, access your server by connecting via your FTP client, and navigate to the Plugins folder (wp-content/plugins). Use the transfer windows or just drag and drop the entire unzipped plugin folder into your plugin directory and wait as the files transfer. Once the transfer is complete, check the main plugin page on your WordPress dashboard to ensure that the plugin was uploaded, and activate it if you like.


How to Style a List with Font Awesome Icons

So we already know how to create really cool pure CSS social media icons using Font Awesome, but what else can we do with this awesome icon library? One really cool way to utilize the icons is by using them in place of bullets when styling unordered lists.

Font Awesome is a library of hundreds of different icons and symbols that can be used for free by developers in any project. It’s a really useful tool to have, especially because using Font Awesome icons are almost always superior to using pngs or jpegs as icons because of how well the Font Awesome characters (color, size, etc) can be manipulated by CSS.

Using the Font Awesome icons in place of bullets or discs that are usually used to style unordered lists is a really cool way to add some unique flair to an otherwise boring list, and it’s also a pretty innovative way to use the Font Awesome library. Keep reading to see how it’s done.

Getting Font Awesome

Like most libraries, Font Awesome can be downloaded and placed onto your server, but the best and most lightweight way to use it is probably to link to the library directly, either in your head section or at the top of your stylesheets using the @import rule. Here’s the link you can insert into the head:

<link rel="stylesheet" href="https://maxcdn.bootstrapcdn.com/font-awesome/4.5.0/css/font-awesome.min.css">

The HTML

We’re gonna start by creating a standard unordered list. If you’re not sure how to build one, check out the HTML below:

<ul>
  <li>First list item</li>
  <li>Second list item</li>
  <li>Third list item</li>
  <li>Fourth list item</li>
  <li>Fifth list item</li>
</ul>

The results of which should look a little bit like this:

Screen Shot 2016-11-27 at 3.36.33 PM

The CSS

The CSS is where you’ll get rid of the standard bullet points and replace them with a cool Font Awesome icon of your choice using the content property combined with the :before pseudo-selector. First, pick the Font Awesome icon you’d like to use as the list item icon. You can see all of the hundreds of Font Awesome icons to choose from on this page.

First, set the list-style-type to none:

li{
  list-style-type: none;
}

So now the list should have no bullets:

Screen Shot 2016-11-27 at 3.49.39 PM

Now we’ll need to use the :before pseudo-selector to select the space before the list items, and the content property to insert the Font Awesome icons as the content before the list items.

In this case, let’s pretend we’re creating a list with a nautical theme, so our Font Awesome icon of choice might be the anchor icon, the unicode code of which is f13d. To use the anchor icon as the list item icon, use the following CSS:

li:before{
content: “\f13d”;
font-family: “FontAwesome”;
width: 10px;
height: 10px;
margin-right: 5px;
}

The results of which should look like this:

Screen Shot 2016-11-27 at 3.56.52 PM

Don’t forget you can also add some color to these icons. Check it out:

li:before{
color: #147efb;
}

Screen Shot 2016-11-27 at 3.58.20 PM

How’s that for a nautical themed list? There are so many Font Awesome icons available that the possibilities for styling your lists are practically endless. Definitely keep this technique in the back of your mind for when you’re looking to create some unique lists.

Using Font Awesome to Create Social Icons

Font Awesome is a really useful tool that provides developers with free access to hundreds of different icons and symbols to use in the projects in place of images and pngs. The great thing about using Font Awesome icons is that because they’re technically characters instead of images, the colors and sizes of the characters can easily be customized using CSS style rules. You can even really easily add hover effects and styling for active and visited states by using the CSS pseudo elements (:hover, :active, :visited).

One really great way to take advantage of these Font Awesome icons is by using them to create social media icons — you know, those buttons you’ll find on almost every site that links to a site’s social media presences. Usually these are created in photoshop and uploaded to a server, but if you’re planning on creating simple or basic social media buttons, Font Awesome is a great, lightweight option to create them easily without having to use images. Keep reading to check out how it’s done.

Get Font Awesome Library

You can download the Font Awesome library and place it onto your server to link to, but if you want an even more lightweight option, you can simply link to their library in the <head> section of your HTML files or at the top of your StyleSheet using the @import rule. See the code you can use to link to the Font Awesome library below:

<link rel="stylesheet" href="https://maxcdn.bootstrapcdn.com/font-awesome/4.5.0/css/font-awesome.min.css">

The HTML

For this example, let’s create icons for Twitter, Facebook, and Instagram. To see a list of ALL the Font Awesome icons and their accompanying code, head over to this page. Here’s the HTML you’ll need to get started:

<i class="fa fa-facebook" aria-hidden="true"></i>
<i class="fa fa-twitter" aria-hidden="true"></i>
<i class="fa fa-instagram" aria-hidden="true"></i>

The results of the HTML above should look something like this:

Screen Shot 2016-11-27 at 2.46.29 PM

The CSS

To really make these icons unique we need to add some styling. Let’s turn them into rounded icons, and let’s add some colors to reflect the brands of each social media network. Take a look at the CSS below to see how it’s done.

 i.fa.fa-facebook, i.fa.fa-twitter, i.fa.fa-instagram{
 border-radius: 100%;
 font-size: 28px;
 height: 38px;
 line-height: 40px;
 margin: 5px;
 text-align: center;
 width: 38px;
 }
 i.fa.fa-facebook{
 border: 1px solid #3B5998;
 color: #3B5998;
 }
 i.fa.fa-twitter{
 border: 1px solid #00aced;
 color: #00aced;
 }
 i.fa.fa-instagram{
 border: 1px solid #833ab4;
 color: #833ab4;
 }

After applying the CSS above, your social media icons should look similar to this:

Screen Shot 2016-11-27 at 2.58.52 PM

Styled beautifully and reflecting the brand identity of each platform!

Extras: Hover Effects

Now that you’ve got your icons styled, adding hover, active, visited, etc effects using pseudo-selectors is really easy. A cool hover effect to add is to change the opacity of the icons when they’re hovered over. To do that, you just need to add the following CSS:

i.fa.fa-facebook:hover, i.fa.fa-twitter:hover, i.fa.fa-instagram:hover{
 opacity: .6;
}

Compare the icons in the image below with the one above, and you’ll see that the opacity of the Instagram icon is less opaque than the others or than the one in the image above — that’s because it has the hover effect applied to it.

Screen Shot 2016-11-27 at 3.01.34 PM