Functions in Python, explained in details for complete beginners

One who has mastered the basic Python utilities such as variables, numbers, lists, tuples and dictionaries; should start to learn about functions and their usage, unless they want to remain in the beginner stage and stop progressing with their journey as a Python coder.

Based on my personal experience with the Python programming language so far, a function is the tool which groups a set of code statements together with the main purpose of helping the coder to utilize the same resources more than one in their applications, without repeating themselves.

By using functions not only do Python coders reduce their future work, but they also group code instructions together with the main purpose of developing a specific utility which solves a specific problem. For example, the following function written in Python computer programming language, is specifically developed to find the sum of two numbers and return the result back to the user.

def find_sum(a, b): return a + b

The above Python function takes as input two parameters,a and b. Based on the value of the parameters, it finds their sum and returns it to the user. As you may know, Python supports arithmetic operations by default.

a + b # python arithmetic operation

Why use functions in Python

There are many reasons why Python coders make use of function in their computer programming projects, but the following is the main two.

  • To maximize code reuse
  • To minimize code redundancy

Another obvious reason why those who code computer software make use of functions, is to split their project into small components which make the process of application development really easy and simple to track the code statements under the hood.

Since Python is an object oriented computer programming language, it is always a good idea to bring practical examples with the main purpose of making the theory completely easy to understand for everyone, even to those who have no coding experience at all.

Imagine if someone gave you a project which deals with the wrapping of the ffmpeg multimedia framework. Wouldn’t it make sense to write specific functions for extracting audio, cutting the videos, extracting images?

Based on my personal experience with Python computer programming language, it would make totally sense to split the project into simple components, by using specific functions. The following is a simple architecture I am writing to demonstrate how Python functions help in splitting the project into small utilities.

ffmpeg.extract_audio
ffmpeg.cut_video
ffmpeg.extract_images

In the above block of Python code, the ffmpeg is the module, and the others is the functions; the small components which build the functionalities of the project.

How to declare a function in Python

Python coders declare functions by using the def statement, which means to define a new function. The example shown below, is a practical one.

def new_function():pass

The pass statement is being used to skip the further coding of the function, it can be used in class statements too like shown below.

class A:pass

One can easily write a new function in Python by using the def statement. For a Python function to properly work, it must return something, a value. The Python return statement is being used to exit the function and send back the value to its caller.

def find_sum(a, b, c):return a + b + c

Once a function is being declared with the help of the def statement, a new object is created and assigned to the name of the function. According to the official Python documentation, the function does not exist until the moment the interpreter reaches and runs the def statement where the function is defined.

A Python function can be assigned to a variable, stored in a list and even nested in if statements or while conditional loops.

For example, the following example illustrates how a function can be nested inside a Python if statement.

if execute:find_sum(1, 2, 3)

Time to open the Python interpreter and put some theory about functions in practice. Once you have launched the Python shell, make sure to write the following function.

def display_name(name):pass

The above function does not do anything at the moment, since we just declared it and passed with the Python pass statement.

Try to extend the above function like shown below.

def display_name(name):print(name)

Our function is not ready to be put in work. Although a very simple one, it is good enough to materialize the theory and the concepts we have covered so far.

The Python function display_name takes an input and displays it on the screen, by making use of the builtin function called print.

Run the following and see what happens.

display_name(‘codetheory’)

One can easily assign a function to a variable, and do the call from the variable. A practical example to illustrate such theory is being shown below.

f = display_name
f(‘codetheory’)

The above function does not return anything, it just displays stuff on the console with the help of the builtin Python print statement.

A function can also have arbitrary user-defined attributes, with the main purpose of recording data which can be used later. Take the following example, a simple function which calculates the final price of a product based on the tax.

def calc_price_of_product(price):
tax = 30
final_price = tax + price
return final_price

How to call a function in Python

Once a function is declared, for it to work, it must be called. One can easily call a function in Python by using the following syntax.

my_function()

Notice the brackets in the above call. Based on the declaration of the function, one needs to pass the right number of arguments as an input, before calling it; otherwise they will run into errors thrown by the Python interpreter.

A call of the Python function display_name needs to be done with an argument as an input. Try to call the Python function display_name like shown below and see for yourself what happens in the interactive interpreter.

display_name()

The interpreter will throw the following error, telling the user that they need to run the function with exactly one argument.

Traceback (most recent call last):
File “”, line 1, in
TypeError: display_name() takes exactly 1 argument (0 given)

Final thoughts

Functions make it very easy for the Python developer to write their projects without repeating themselves. Another reason why Python functions make a great utility when it comes to software development, is the fact that they help to split a big project into small components, specific to carry out certain tasks.

Through this article, we went through basic concepts of Python functions, knowledge which everyone should master in order to progress on their journey as Python coders, especially the complete beginners.
Complete list of skills you need to become a Webmaster, first part

Being a computer nerd who has experimented with a lot of different things, I have had the opportunity to build websites for people, completely from scratch. Not only have I developed websites, but I have also managed them since they’re dynamic web applications which require updates. This job, which I am currently doing right now, is called Webmastering.

In other words, Webmastering is the process of maintaining one or many websites. Personally I do love such skill, as not only it is widely applied in the computer world, but it also helps one interact with different people, from different regions and cultural backgrounds.

Although a junior Webmaster, the passion I have for the craft gives me confidence to guide others, especially newbies who have no idea about the field. Having earned some experience in the Webmastering field, I am going to compile a list of skills one needs to master in order for them to start managing websites on internet, for their personal usage, or for profit.

Html skills

Web applications make use of the html technology, a computer language which is used to structure information on the web applications. Easy to read and write, html is being widely used by Webmasters worldwide during their daily activities while managing websites on the internet.

Based on my personal experience with the Webmastering, html is for sure a necessity, especially if one wants to develop their web applications completely from scratch. Most of the websites a Webmaster manages, are not static, they may break and stop working; that’s why it is always a good idea to get html skills on your toolset.

There are plenty of resources on the internet from which one can learn html, completely for free. Although html is not hard to learn, it may be a bit tricky to practice, since the beginner has no idea how to put it in use in real projects.

With the main purpose of helping beginners and intermediate geeks to effectively utilize the html technology in real projects, I am going to share many tutorials in codetheory.in. For now, just make sure you have written it on your notes, how important it is for one who wants to become a Webmaster, to learn and master the Hypertext Markup Language.

A server side language

Most of the web applications is based on three tiers, such as the rendering tier, the logic tier and the storage tier. Html is a good technology when it comes to rendering, since it is being executed in the browser. It does not make sense to use html as a scripting language which handles logic, for example trying to communicate with the database of a web application. It can not do such thing as it is not being built for that!

There are many computer programming technologies one can use to handle the logic of a web application. Nowadays computer nerds develop programming languages to solve specific problems, and there is many technologies one can pick up when it comes to implementing the logic tier of their web application.

Personally I prefer Python. Not only it is open source, free as in beer and truly effective when it comes to prototyping, but there is also so many web frameworks written in it which make the life of a Webmaster truly easy. Easy to read and write, Python is a very good tool a true Webmaster should learn.

Most of the Webmasters out there make use of PHP, which is great when it comes to scripting stuff and writing web applications too, but there is no way its syntax can beat Python. Personally I don’t know PHP, and right now I have no plans to learn it. For sure PHP is a very useful tool to the Webmaster since there is many web applications written in it on the Internet, but I do prefer Python.

There is many scripting languages you can choose from when it comes to accomplishing your tasks as a Webmaster, choose the one that fits your needs the best.

A database technology

Most of the web applications programmers write nowadays are database driven as they need to store information somewhere, such as name, address, phone number, credit card etc. There is so many technologies that can be used as a database for web applications. A Webmaster should know basics of the technology they’re using in their storage tier, so they can easily fix almost any problems that come out of it.

Database technologies such as MySQL, PostgreSQL and MongoDB are currently being used widely by almost any Webmaster who truly knows what he or she is doing.

Although I am not a master of SQL databases, I totally recommend to you MySQL as it has a long history in the computer programming industry.

Final thoughts

One does not master their craft over night. Webmastering can not be mastered in one day, nor in one month, nor in one year. A good Webmaster should learn about the main technologies being used to develop the basic structure of a web application before diving deep into the waters. The three skills that one should learn in order to start their journey as a Webmaster shared in here, is more than enough to begin with. In the next part, I am going to share other skills which a good Webmaster needs in their toolset.

Basic Python skills everyone needs to start their coder journey, first part

What is python

Python is a high level computer programming language easy to learn and can be simply put in use by anyone who is passionate about coding. The first time I started reading some python code it felt like i was reading myself, I mean my thoughts converted to code.

Heavily used by Google and Youtube python is becoming very popular among computer programmers all over the world especially in the startup world as it features rapid development making it the swiss army tool for prototyping.

Why learn python

Many of you may ask why learn python and not java or another programming language. This is the right question to ask for a starter in the coding world and I will list some arguments below why one should start learning python as their first computer programming language.

It will take you probably two weeks to learn all the python syntax needed to build real world applications. Or just a few days if you are a passionate reader about these kind of topics.

The fact python is easy to read makes it easy for you as a developer to maintain the code of your project. As the project grows in terms of code you don’t want to come back after your holidays and when looking at the code you have written, not understanding at all how it really works under the hood.

I have had the chance to talk to a python developer who did perl programming for a living back in the days and he told me it is real hard to maintain the code of his old projects. Not hard, but real struggle!

Python is fully Open Source which means that you can look at its implementation code and understand stuff from a lower level perspective.

You can code python on almost any platform. Telling from my experience I have been able to run my python scrips in both Windows and Linux operating systems except for Mac because it is such an expensive toy for me, but for sure you can code python on Mac too.

Python is not just a language. It has a big community behind who is very welcoming and it makes you feel like Home. I am very happy to have met so many python developers in Firenze Italy back in 2013. I felt real love in there.

Some technical knowledge on python

You can notice a python file by the .py extension. Every file that ends with this extension is classified as a python module. For example the following is a python module.

pythongeek.py

The module serves as a container for the python code of our app and we can use the code of a module in other modules by importing it with the import statement like shown below, but do not try to understand this thing right now as this tutorial is just an introduction. I am sure some things may not make sense to you right now and that’s alright.

import pythongeek # imports the pythongeek module

Since python is an intepreted language you will need the official python intepreter to run python code on your machine. In most linux distributions such as Ubuntu it comes installed by default, but in Windows you have to install it yourself.

Having struggled myself with the installation of Python 2.7 on my Windows 7 machine, I decided to write a concise and easy to follow tutorial for everyone on how to download, install and configure Python 2.7.11 on Windows operating system. The tutorial is published on this website, make sure to check it before going any further, especially if you’re using Windows 7 as your main operating system.

Learn and build the basic Python coding skills

Now that you have python available on your machine it is time to build some basic coding skills to build the foundations for further development.

Now that you have a python interpreter in your machine it is time to start some coding. To open the python shell on windows just go to Start and in the search box type python.

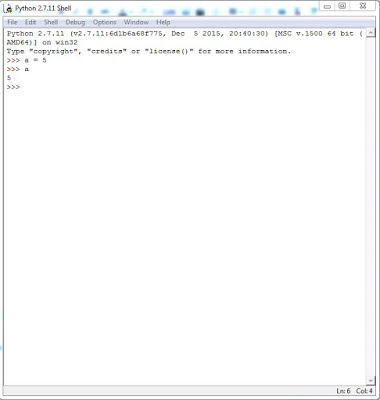
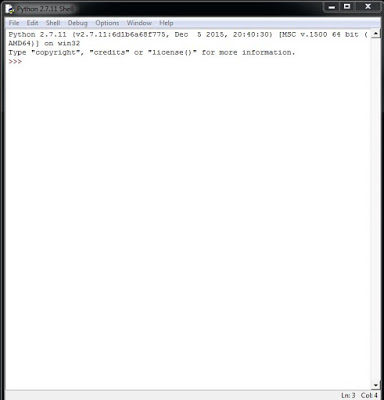
Then click on IDLE (Python GUI). The following python graphical shell will come up.

Those who make use of Linux based operating systems, can follow this tutorial too as the python syntax is the same, it does not change per os. So open your terminal, and start to follow.

The above screenshot shows the graphical Python shell supported by Windows machines; for the purpose of this tutorial we are going to use this shell.

Variables

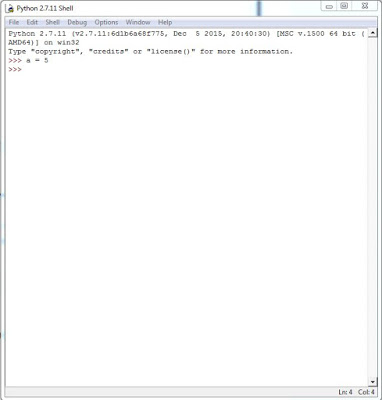
The first thing you need to learn in python is how to declare a variable. You can declare a variable in python like shown below.

a = 5

Where a is the name of the variable and 5 is the value this variable is linked to.

To get the value of the variable you type the name of it and hit Return (Enter) on your keyboard.

python basics

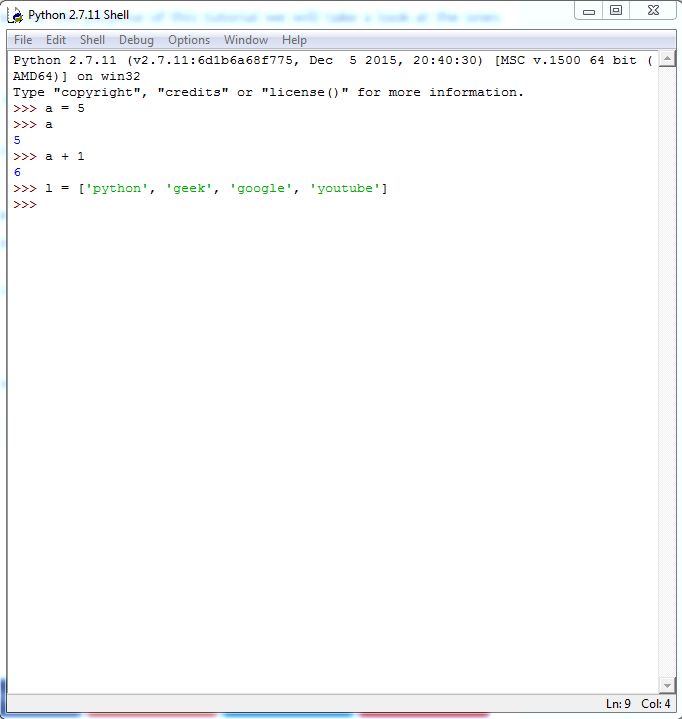
You can also do some maths in Python. The following is a simple arithmetic operation which the Python programming language supports.

a +1

Tuples, Lists, and Dictionaries

Let’s get more pythonic. There are special builtin datatypes in python such as the following:

  • Lists
  • Tuples
  • Dictionaries

There are many others, but for the purpose of this tutorial we will take a look at the ones listed above.

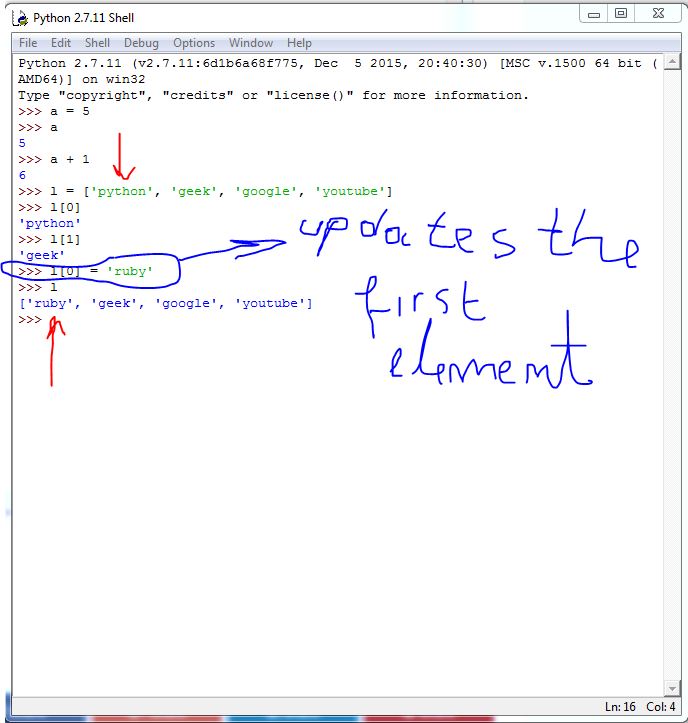
Let’s take a look at lists. For example the following is a list assigned to variable l.

l = [‘python’, ‘geek’, ‘google’, ‘youtube’]

python basics

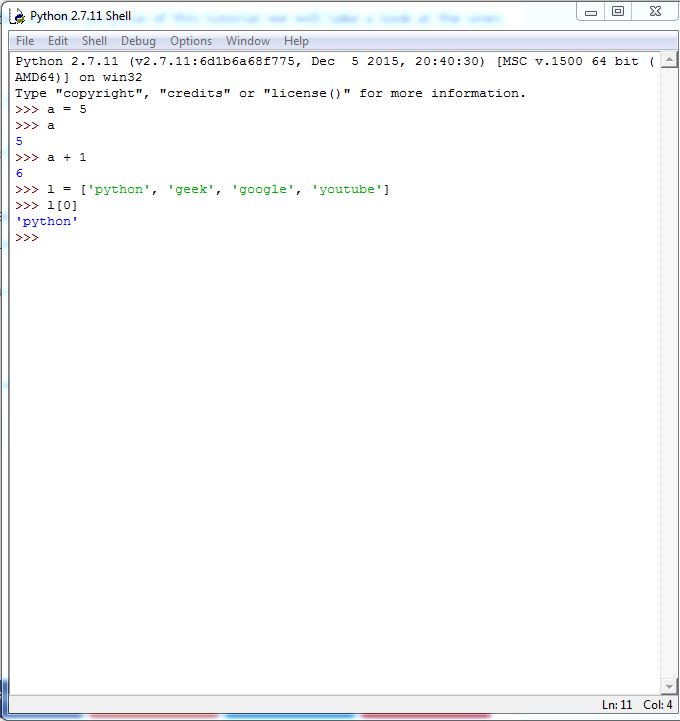
Lists elements can be accessed and used in a program. For example to access the first element of the list you use the following syntax.

l[0] # where l is the list and 0 is the index of the first element

python basics

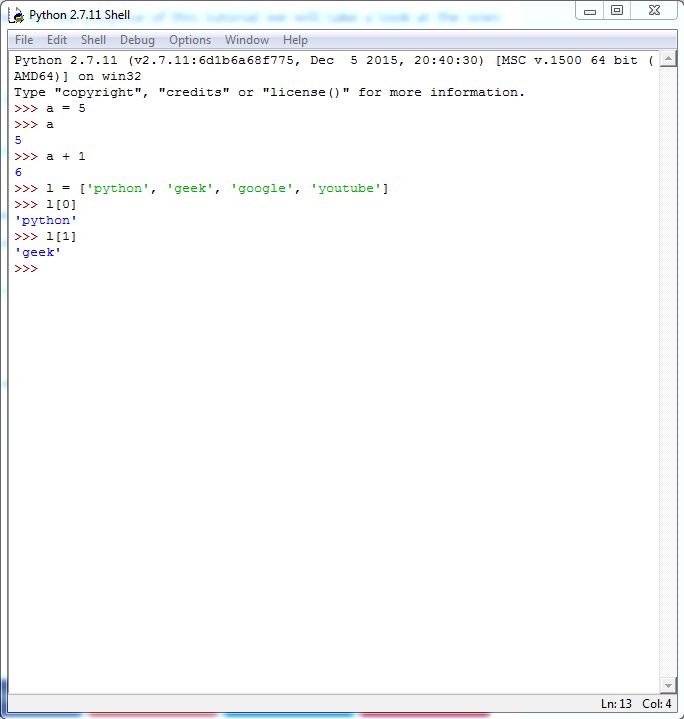
So to access the second element you do the following.

l[1]

A list can be updated. For example you can change the first element in our list by doing the following.

l[0] = ‘ruby’

As you can see, when printing the new list the first element is updated.

l

python basics

We will cover lists in more depth in specific tutorials. Now it is time to learn about tuples.

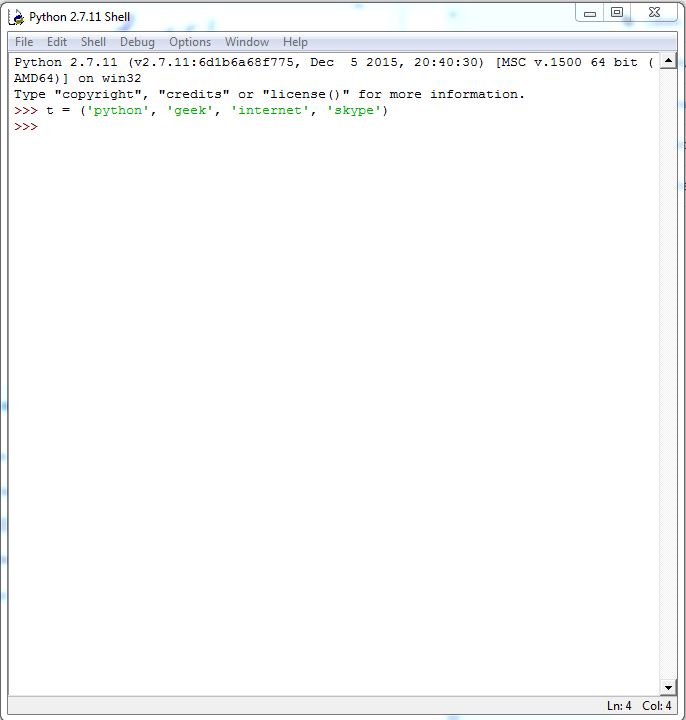
You can define a tuple like shown below.

t = (‘python’, ‘geek’, ‘internet’, ‘skype’)

python basics

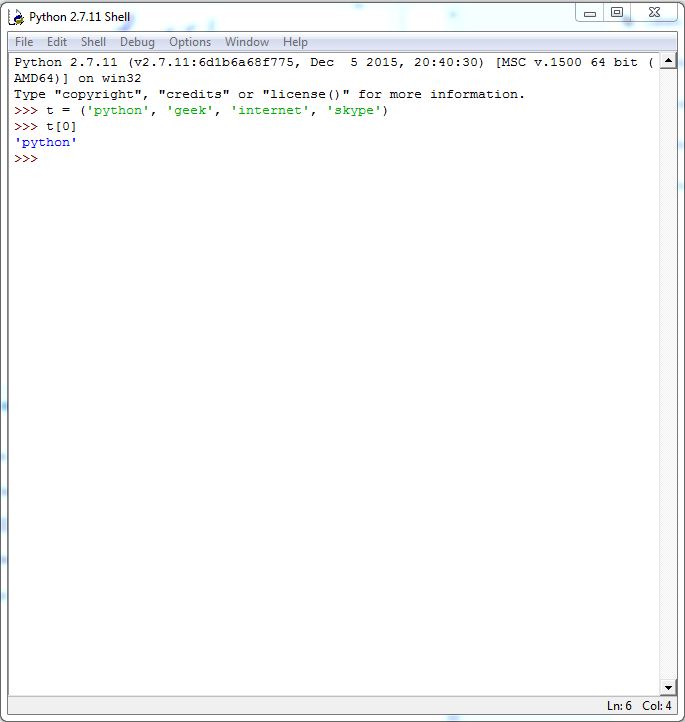
The same as in lists you can do indexing in tuples too. For example to get the first element of the above tuple you do the following.

t[0]

python basics

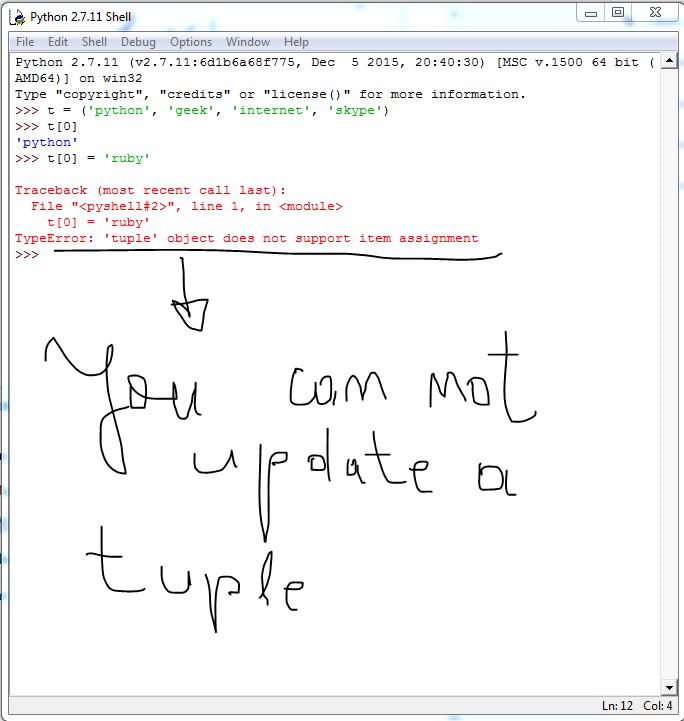
So tuples are like lists? Not really!

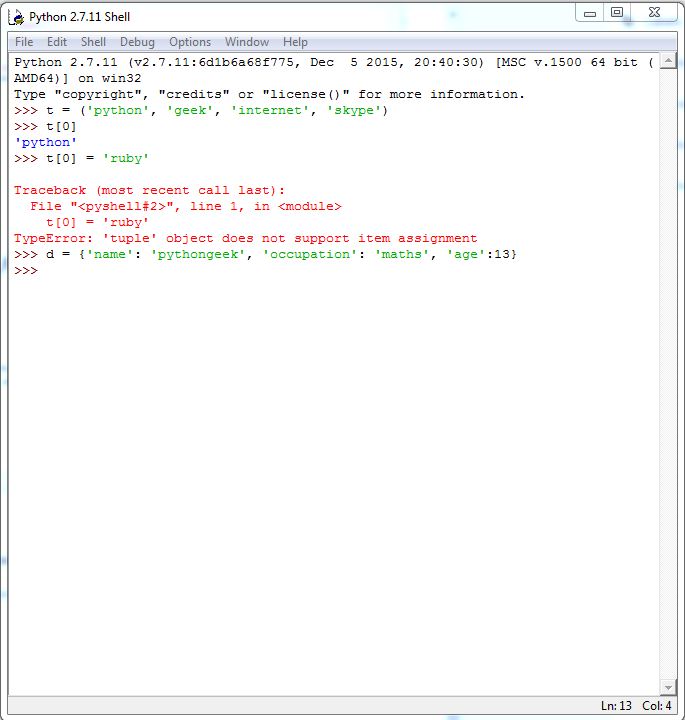
Try to update the first element of the tuple we have and see what happens.

t[0] = ‘ruby’

python basics

Let’s move to dictionaries. For example the following is a python dictionary.

d = {‘name’: ‘pythongeek’, ‘occupation’: ‘maths’, ‘age’:13}

python basics

Each item of the dictionary is composed of two elements: a key and a value. For example the first item of our dictionary is composed of the key ‘name’ and the value ‘pythongeek’.

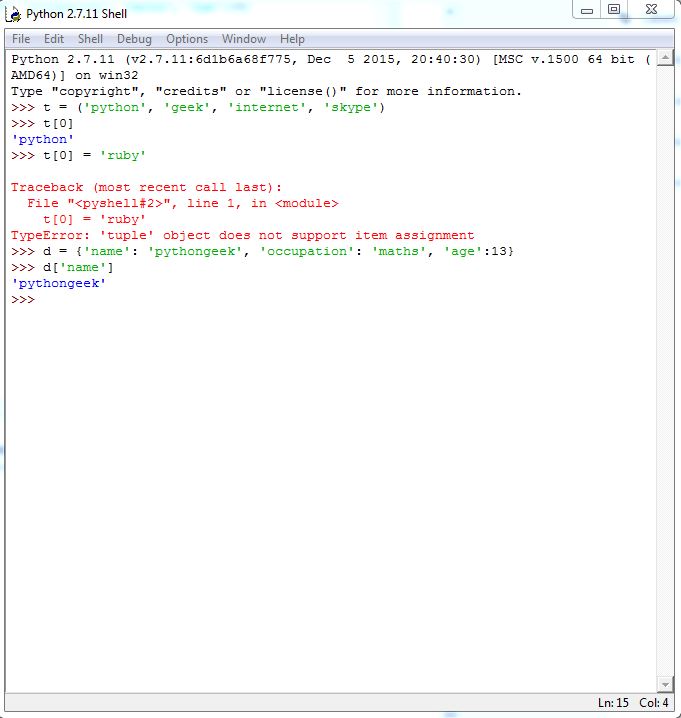
Try the following.

d[‘name’]

python basics

As you can see you access the value of an item in a Python dictionary by its key.

Final thoughts

Before one can code any big application or project in Python, they need to learn and master the basics of this amazing computer programming technology. In the next part, codetheory.in will share more python knowledge one needs in order to progress in their coding journey.

How to install and configure Python 2.7 on Windows 7, so you can execute the scripts from cmd

Python comes already installed in most of the linux based operating systems, probably because they’re mostly being used by heavy computer geeks who is passionate about coding and computer technologies in general. Unfortunately for those who make use of Windows 7, they have to manually download, install and configure Python on their machines completely by themselves.

The beginner who has no idea on how to properly setup Python 2.7 on their Windows 7 computer, is completely left with no official solutions; they have to swim completely alone unless they find a good tutorial on the internet, which explains everything in details so even a complete newbie can understand.

Having struggled myself in the beginning of my journey as a Python coder, I finally decided to write a very concise and easy to follow tutorial for anyone out there who is interested in installing and configuring Python 2.7 on their Windows 7 operating system.

There are many ways one can configure Python programming technology on their Windows machine. The main purpose of this tutorial is to give one the proper instructions on how to install Python 2.7 on Windows 7 so they would be able to execute scripts directly from the Windows command line interface, which is widely known as cmd.

Before going on with the technical instructions, it is truly important for one to learn about environment variables and their purpose on Windows machines.

Windows environment variables

The information about Windows environment variables being shared in here is for complete beginners, for those who have no idea about them. It does not intend at all to cover them in details, but only for the purpose of understanding their important role in configuring Python 2.7 on Windows 7 so one can easily test and run their Python scripts from the command line.

An environment variable in Windows is mainly being used to point to specific paths of executables so the system can directly execute the programs from the command line, without the need of the absolute path. Each program installed on Windows 7, and I do believe in all operating systems available out there, gets placed in specific path, in a specific directory. For the system to keep track of these paths, the environment variables is being used.

One can easily access the environment variables of their Windows 7 machine, by following the instructions being shown below.

System Properties, Advanced, Environment Variables.

Download and install Python 2.7 on your Windows 7 computer

Before proceeding with the download and installation of Python 2.7 on your Windows 7 operating system, it is important to find out the system type. Do you have a 32 bit machine or a 64 bit one? Based on the architecture of your machine, you will download the specific Python 2.7 interpreter.

To find out your system type go to Start, right click on Computer and go to Properties; the following will come up.

As you can see from the above screenshot I have a 64 bit machine. I need to download the python installer for 64 bit system type.

Now go to the python official website and go to Downloads. Under Downloads click on the Windows category.

Depending on the system type you have, you have to download the right version. In the following screenshot everything is self explanatory so take a look at it and click on the python installer for your type.

python installation

Note: The version of python we need is 2.7.11

Download the right version of python for you and move it on Desktop like shown below.

python installation

Then do a right click on the python installer you just moved to Desktop and click on Install. The installation of python will start. The following box will show up.

python installation

If you don’t want to make python available to other users then just select the second option and click Next. I prefer to leave this as default.

The next box will ask you about the path where you want python to be installed. Please leave this as default as you are new to this stuff.

python installation

The C:\Python27\ is the path where our python installation is going to be placed. We will need this path for some configuration so make sure to save it in a notepad file.

C:\Python27\

Then the following will show up. Make sure to click Next.

python installation

Once the above step is completed, the installation of the official Python 2.7.11 interpreter will start on your Windows 7 machine.

python installation

When the setup is close to the finish, just click the Finish button like shown below.

python installation

We are not done yet!

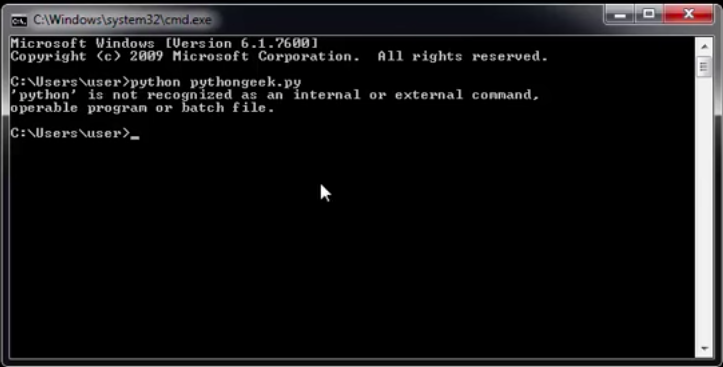
If you go to your Windows 7 cmd and type python in there, like shown below, you will probably get some error, like path not found.

python

The error occurs because the system does not know where to look for the windows executeable named python. It does not exist.

python installation

You have to create it.

Setup python path in Windows 7

So what you need to do in order to execute python program from the command line is to edit the Path environment variable.

First go to My Computer, Properties, Advanced System Settings, Environment Variables. Then find the Path environment variable and click on it; then click Edit.

In the end add the following path.

C:\Python27\

After you have copied the above path and added it in the Path environment variable, click Ok. You will now be able to execute Python 2.7.11 directly from the cmd.

I also have a video in which this article is based. Please make sure to watch it after reading this tutorial, so you can get a better idea on the stuff being explained in here.

How to install Django on Ubuntu 14.04 LTS for python geeks

About Django

Django is a great web application development framework for the perfectionist with deadlines built in python programming language. It provides a very good structure and common methods that help to do the heavy lifting when writing web applications.

If you have never used django before and are looking for an installation guide on your Ubuntu 14.04 LTS then you are in the right place. Through this article we will teach you how to setup a very simple django development environment step by step.

Some Tools We Need

There are many different ways to install the django framework in Ubuntu. In order to stay updated with the latest python development industry standards we need to install a few tools before getting Django up and running on our machine.

The first tool is called pip which is a very practical python package management system widely used by python developers all over the world. I mainly use pip to install packages for my python projects, generate dependencies of a project and also uninstall different python packages from my machine when they are no longer required.

Before installing pip we highly recommend to our users to update the package index on their machine with the help of the command shown below.

sudo apt-get update

The following command can be used to install the pip python package manager inside Ubuntu 14.04 LTS.

sudo apt-get install python-pip

Now we can easily install python packages on our Ubuntu 14.04 LTS machine by following the syntax shown below.

pip install name-of-python-package-here

But we do not recommend installing packages yet! Python developers use another tool during the development of their python projects.

This tool is called virtualenv. It is really useful as it helps to manage dependency conflicts of different python projects on the same machine. In short words the tool virtualenv helps to create isolated virtual environments where you can develop without any worries about package conflicts.

To install virtualenv on Ubuntu 14.04 LTS the following command can be used.

sudo pip install vitualenv

What is the next step? Do we need to make use of the tool virtualenv? For sure!

Create A Virtual Environment For Your Project

virtualenv can be easily used to create isolated virtual environments for your python projects. For example to create a virtual environment under the name of venv1 the following command can be used.

virtualenv venv1

In order to work on an isolated environment it needs to be activated. The following command does it for you.

source venv1/bin/activate

But working with virtualenv is a bit annoying as there are many different commands you need to remember and type on your terminal emulator.

The best solution is to install and use virtualenvwrapper which makes working with python virtual environments very easy. Once you have finished installing and configuring virtualenvwrapper working on a virtual environment is as easy as typing the following command.

workon venv1

Now that pip and virtualenv tools are available on your machine it is time to install and configure virtualenvwrapper.

To install virtualenvwrapper use pip like shown below.

pip install virtualenvwrapper

There are a few steps you need to follow in order to do this properly. On your command prompt run the following command.

source /usr/local/bin/virtualenvwrapper.sh
All virtual environments you create will be available inside the directory ~/.virtualenvs.

If you want to keep your virtual environments inside another directory then use the following commands like shown in the official documentation of the virtualenvwrapper.

export WORKON_HOME=~/Name-Of-DIrectory-Here
mkdir -p $WORKON_HOME
source /usr/local/bin/virtualenvwrapper.sh

I like to keep my virtual environments inside ~/.virtualenvs. My projects are inside ~/projects.

To create a virtual environment just use the command mkvirtualenv like shown below.

mkvirtualenv linuxtuts
The following output is displayed on my terminal when executing the above command.

New python executable in linuxtuts/bin/python
Installing setuptools, pip...done.

To work on the virtual environment linuxtuts use the following command.

workon linuxtuts
Once the virtual environment has been activated your command propmpt will change. Mine looks like shown below.

(linuxtuts)oltjano@baby:~/Desktop$
As you can see from the output shown above linuxtuts is the name of the virtual environment we created.

Make the changes permanent

In order for the commands offered by virtualenvwrapper to work anytime you open the terminal it is needed to make some changes in the .bashrc file.

The .bashrc file is used to setup environment variables, functions aliases and many other stuff you want to have when opening a new terminal window. Read more on .bashrc.

Open the .bashrc file with your text editor, copy paste the following in it and then save the file.

export WORKON_HOME=$HOME/.virtualenvs
source /usr/local/bin/virtualenvwrapper.sh

Install Django

Inside the virtual environment use the command which python to see the python executable you are using.

which python
The above command produces the following output on my machine. Depending on the name of your directory for the virtual environments you will get a different output, but structured in a very similar way.

/home/oltjano/.virtualenvs/linuxtuts/bin/python

The above output is telling us that the python executeable being used is inside the virtual environment which in this case is linuxtuts.

Deactivate the virtual environment with the command deactivate.

deactivate

Remove the virtual environment linuxtuts with the help of the following command.

rmvirtualenv linuxtuts
The reason why we decided to remove linuxtuts is because we did not choose the version of python we want to use inside the virtual envrionment we created.

It can be done with the following command.

mkvirtualenv -p /usr/bin/python-version-here

In a project I am working on we use python3.2. To run the project I create a special environment for it.

mkvirtualenv -p /usr/bin/python3.2 linuxtuts

The above command produces the following output.


Running virtualenv with interpreter /usr/bin/python3.2
New python executable in linuxtuts/bin/python3.2
Installing setuptools, pip...done
Also creating executable in linuxtuts/bin/python

The command prompt will look similar to mine.

(linuxtuts)oltjano@baby:~/Desktop$
You can use any python version required by your project. The installation of django is very easy.

Just run the following command.

pip installl django

The above command produces the following output.

You are using pip version 6.0.7, however version 6.0.8 is available.
You should consider upgrading via the ‘pip install –upgrade pip’ command.
100% |################################| 7.4MB 40kB/s

Collecting django
Downloading Django-1.7.6-py2.py3-none-any.whl (7.4MB)
Successfully installed django-1.7.6
Installing collected packages: django

To install a different version of django than the default one specify the version like shown below.

pip install Django==1.0.4

It is up to you which version of python and django you want to use for your projects. Our mission is to help how to install them.

Setup your first simple project in django

After you have finished the installation of django in a virtual environment you probably want to start your first project.

Fortunately for us django offers management tools for your projects. The django-admin.py tool can be used to start the project.

Create a fresh virtual environment for your new project.

mkvirtualenv -p /usr/bin/python2.7 fresh_project

Note: Depending on the version of python you want to use you need to change the path listed above.

Install a new copy of django inside your virtual environment.

pip install django

Use the following comand to start a fresh django project.

django-admin.py startproject fresh_project
Then cd to your project directory and list the files inside your project. The directory structure will be similar to the one shown below.

fresh_project manage.py

The manage.py ,is another tool you have to use on your django projects. Each django project is composed of apps.

You can create a new app with the following command.

python manage.py startapp myapp

If you do an ls now the directory structure should look like the one shown below.

fresh_project manage.py myapp

It is always a good idea to generate the requirements.txt file for every project you write in django so when you show it to your friends or want to run the project in another machine you can easily install the needed packages to run the project.

Create a new file called requirements.txt on the top level directory of your project and append the packages in there using the following syntax.

django==1.9.5

As you can see from the above command you append the package name then you add its version which really important.

If you do an ls now inside your project you should get the following.

fresh_project manage.py myapp requirements.txt
And you install the requirements for the project on a new machine by using the following command.

pip install -r requirements.txt
Are you asking yourself how to run the django project? Just run it using the following command which starts the builtin django development server.

python manage.py runserver
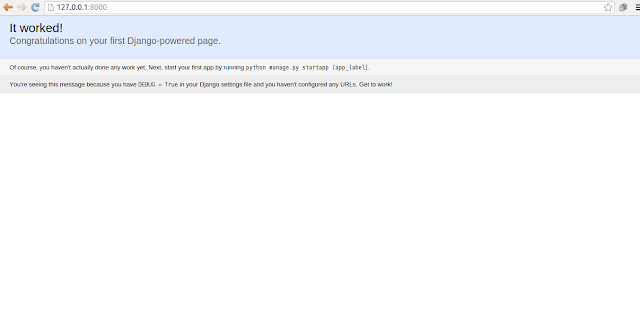
And then visit http://127.0.0.1:8000/. You will get a message from django congratulating you running your first django project like shown in the following screenshot.
django installation finished

Conclusion

Knowledge on tools such as virtualenv and virtualenvwrapperis a must for a python developer. In this article I showed you how to install django on Ubuntu 14.04 LTS and also how to setup a very basic django development environment.